Media cues
Media cues provides playback capabilities, thanks to GStreamer we provide support for a very wide range of media formats, and a variety of effects can be applied at runtime without modification to the source files.
Warning
Currently only audio playback is supported
Audio Cues
Audio cues allow you to playback audio files.
Note
It’s possible to play the audio of video files
Options
When editing a media cue options, two sections (tabs) are provided,
one (Media Cue) has a few common options, while the second (Media Settings)
provides fine-grained control on the multimedia source, output and applied effects.
Media Cue
Start time: Start position of the media
Stop time: End position of the media
Loop: Number of repetitions after first play (-1 is infinite)
Start/End time allow you to trim the media file without modifications, keep in mind that the UI will keep showing the original file duration independently of these options.
Loops allow to replay the same media multiple times, they should be seamless if the media content is seamless
and depending on the media format, .wav are usually a safe option.
Loops can be stopped “artificially” via a Loop Release action.
Media Settings
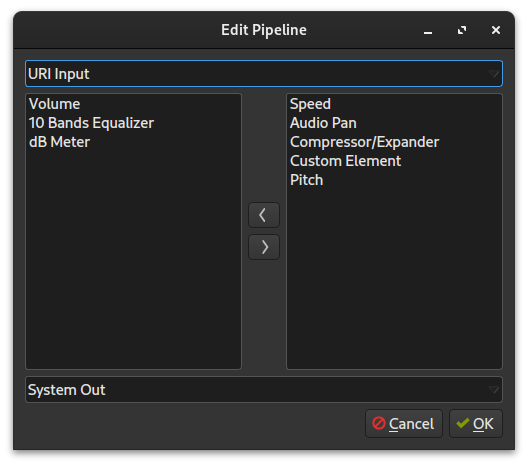
Each media cue is made of a sequence of elements, referred as “pipeline”:
One “input”
Any number of “plugins” or “effects”
One “output”
In this section both, the pipeline composition and each element options can be controlled.
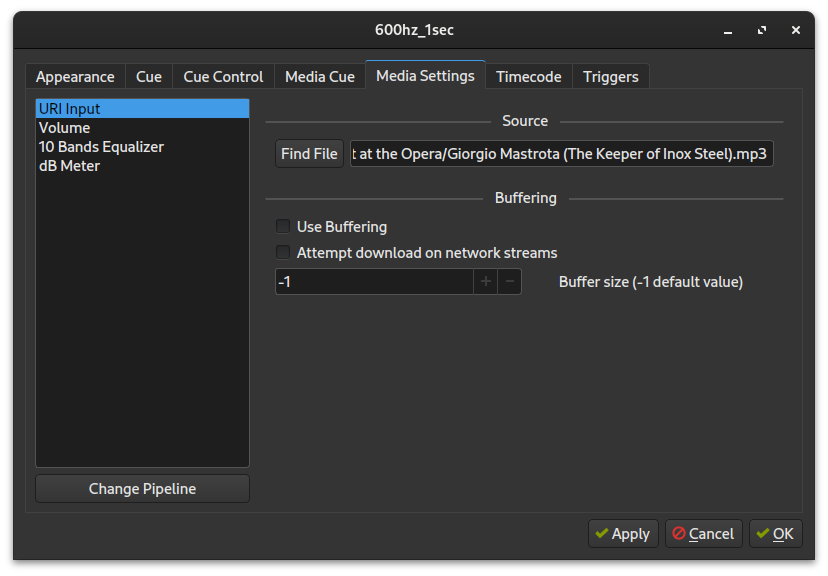
Active elements can be changed using the Change Pipeline button (bottom left)
Note
The default pipeline composition can be changed via File > Preferences > Plugins > GStreamer, and will apply on news cues.
Note
While editing multiple media cues at once, it’s necessary to Change Pipeline to select the elements to update.
The pipeline itself cannot be canged in this mode.
Inputs
URI Input
Read and decode data from a file, local or remote (e.g. http, https, etc..)
Source: the URI to look for data (a “find file” button is provided for searching local files)
System Input
Get the audio from the system-default input device (e.g. microphone), no option is provided
Note
To use System Input you need to create a media cue with a file, and then change the source element.
Effect/Plugins
Used for audio-processing or data-probing, in some case the order affect the results
Volume
Allow to change the volume level, or mute the media.
Volume: volume level in dB (can be muted)
Normalized Volume: parameter used by other components (e.g. ReplayGain) to normalize the volume level without affecting user values, you can only reset the value (to 0dB).
10 Bands Equalizer
Allow to equalize the media with 10 frequency bands [30Hz-15KHz].
dB Meter
Allow external components to get the current sound level, used for UI visualization.
Time between levels: millisecond between one extracted value and the next (lower values will increase CPU usage)
Peak TTL: Time To Live of decay peak before it falls back (in milliseconds)
Peak falloff: Decay rate of decay peak after TTL (in dB/sec)
Speed
Speedup or slowdown the media, without affecting the pitch.
Pitch
Allow to change the media pitch by semitones.
Compressor/Expander
Provide Dynamic range compression.
Type
Compressor
Expander
Curve shape: Selects how the ratio should be applied
Hard Knee
Soft Knee
Ratio: Ratio that should be applied
Threshold: minimum value from which the filter is activated (in dB)
Audio Pan
Allow to control stereo panorama (left ⟷ right).
Note
When used the audio will be forced to stereo
Custom Element
Allow to manually create a custom GStreamer “elements” using the framework syntax, some instruction and example can be found here.
Outputs
Send the audio to an output device
Auto
Use the system-default output device, no option is provided.
ALSA
Output to an ALSA device
ALSA device: the output device to be used
PulseAudio
Output to the default pulseaudio output device, no option is provided.
Jack
Output to a Jack server.
Warning
Native JACK is not support in flatpaks, you can get JACK working via PipeWire (pipewire-jack)
The Edit connections button allow to view and change the connection for the cue:
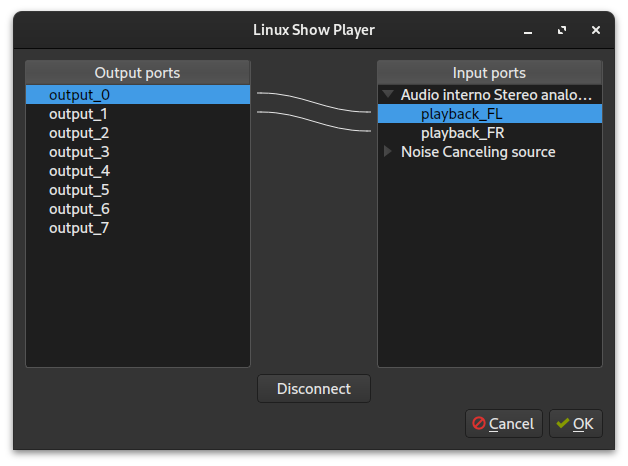
On the left the cue outputs, on the right the available inputs, by selecting one input and one output it’s possible to connect/disconnect using the provided buttons.
Note
Each cue will create a new connection on demand, do not rely on the given names.